
over the years (five to be exact!) i've made a blog book for each year, documenting our lives in a nutshell. i have grown very fond of using blurb.com for all of my blog-to-book needs but realize that there are a few things that make working with blurb.com a little tricky.
i've had multiple people tell me that they'd have no idea how/where to start...so if you've ever thought that, this post is for you!
1. download the blurb booksmart software onto your computer and create an account here.
2. launch the booksmart software. this is where you can choose what size of book to make. i have always done the standard landscape, but you can choose whatever you want!

3. click on "blog to book" and blurb will have you enter in your blog address & password.

4. if you've been keeping a blog for awhile, you may have a lot of entries. that's ok! if you want to make a yearly book (that's what i do) click on the box near the bottom that says "select none" and then go through your list of blog posts and only choose the ones specific to the year you are doing.

** 5. this has been an important step for me: check the box that allows you to drag and drop entries into your own book. if you have blurb autopopulate it for you, it tends to be a giant mess and most likely won't look the way you want it to. this will take more time but it'll be worth it!! **

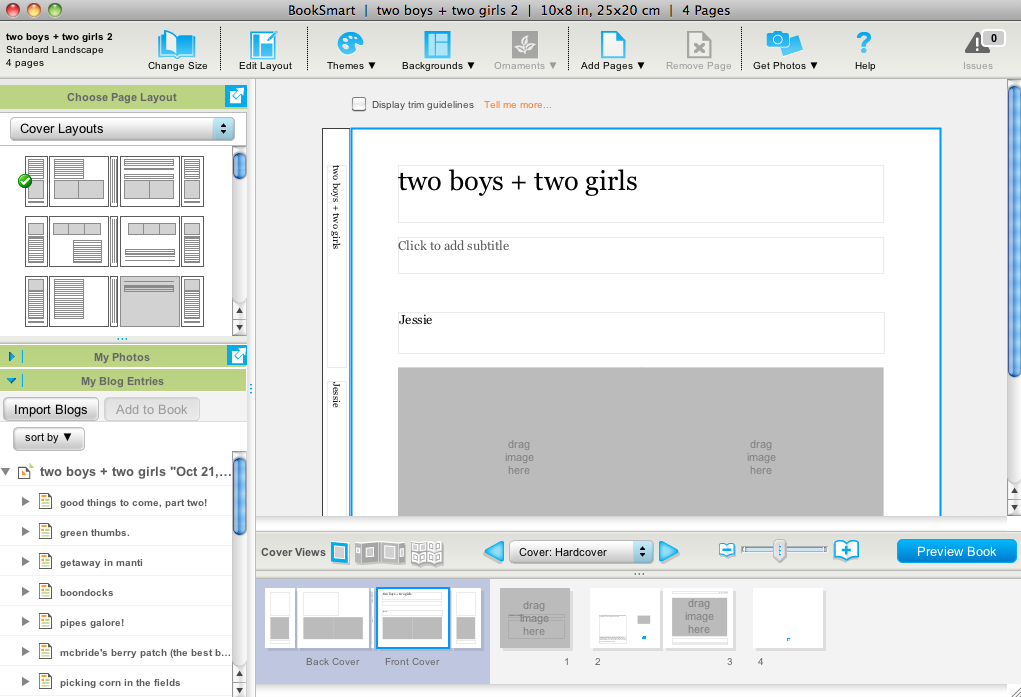
6. sit back while blurb "slurps" all of your photos! depending on how large your book is, this may take awhile. when i make my yearly blog books, i have usually have about 1,000 pictures in one book!! it's a little insane :)

7. you should now see this page, which will be your main workspace:
(try not to get overwhelmed! :)
8. working one entry at a time grab the page icon from the left side of your screen (the first one listed on my page is "good things to come, part two!" and drag it into a text box. it will automatically drop your entire blog entry into the text box. you can see which text box i chose below. you may want to play around with the text boxes, depending on how much text you have in that particular post:

9. since you currently only have 4 pages in your blog book, you're going to want to add some photo layouts for all of those pictures you've got! on your toolbar, click on "insert, photo-" (you choose how many photos you'll want on a single page. but don't stress about it too much; it's really easy to change later on).

10. i ended up adding 25 of the four page spreads, but do whatever you're comfortable with. this is what you should see now:

11. since i only had four pictures in this whole blog post, this layout worked well for me! however, if you don't like the layout that you've chosen, simply click back on the picture layouts and pick a different one. this particular post is now done!!

12. i like to close each blog post tab once i'm done working on it, to reduce confusion and to help me remember where i'm at in my book in case i need to take a break. my next blog post is titled "green thumbs" and i'm going to repeat the steps over & over again until my entire book is done! it really isn't difficult, just a little time-consuming and tedious :) sometimes it's nice to have a mindless activity to work on!
you can do it!! and please let me know if you have any questions at all. chances are, i have dealt with the exact same thing before!
just a few last tips before i go:
+ when dragging over your text box, make sure to grab it by the colored icon, not the b&w one:

+ also, proof-read over everything and reformat as needed. this is what it originally looked like when i first dragged it over:

+ and this is what the final product looked like. i just added spacing throughout the post, which i like the look of better:

+ another problem you may run into is blurry/low-resolution photos. as soon as you insert a photo with a "low-resolution" this is what will pop-up. don't let it scare you! i've done one of two things:
1) ignore it.
2) click the "fix" button and see what happens.

this is what happened when i clicked on the button for the picture above. not a whole lot, right?! it resized my image a teeny-tiny bit, but the overall look isn't affected, so i'm going to leave it like that.
sometimes when you resize an image, the size will be greatly impacted and you can either choose a different layout to accommodate a smaller image or edit "undo" to bring it back to the way it was.

when i printed my last blog book, i had over 30 "warnings" telling me that my images were going to be blurry...but they really aren't that noticable. use your best judgement (does it actually look blurry on the screen?) and try not to worry!
+ if you've got a lot of pictures (like i do!) this is one of my favorite picture layouts (you'll see it a lot while flipping through my books. but again, it's totally up to you! play around with it and have fun!

these books are our little treasures (my kids are even starting to understand the importance of them and love to look through them!) so investing some quality time will totally pay off!
last little word to the wise: blurb is always sending out coupons so don't print a book unless you've got a coupon code! i have never printed off a book without (at least) a 20% off coupon :)
and again...let me know if there is anything at all i can do to help!
GOOD LUCK!
Oh my gosh Jessie, this is perfect! I lost a post I published last week and it freaked me out, so I decided that I need to get on this ASAP. Thanks so much for writing it out! Couple of questions:
ReplyDeleteWhen you say that you will just organize it yourself, does it still keep it all in order? It looks like it does...over on the left, you just have the different posts with the corresponding pictures still with it?
Do you usually fit all your posts onto 1 page each? Or I guess 1 page spread.... Do some posts with lots of pictures spread over more than 1?
Do you have to do it all in order, or can you rearrange pages? Like if I want to skip a long post and come back to it, will it then be out of order?
Oh, and where do you usually get your coupons?
ReplyDeleteI've done this, but just for pictures books. I need to do this WITH my blog posts, but I think I'm just embarrassed to read through past posts because my writing was usually terrible and weird. hahahaha I'm much better with my writing now than 5 years ago when this lil bloggie began! Good for you, girl. You inspire me!
ReplyDeleteyou inspired me to do it! i just finished 2008 (crazy!) but don't want to print it without a coupon. where can i find that? Thanks girl!
ReplyDelete